My project began with a smaller boat, something like a small knarr or large ship's boat. The basic concept was to use a foam core to give the hull its proper shape, then use 1mm-thick balsa sheets for the hull planking. Here is a glance at that first proof-of-concept boat, but you can also see the full write-up here.
Building the cog began much the same way: I took a 2D ship plan I'd been using in early games to trace out the basic hull shape onto a cardboard template, then onto a 20mm-thick foam insulation sheet (the dense kind) and eyeballed the angle I wanted to give the hull once it was glued to the foam core.
Once this cardboard template was cut, I transferred the shape to 1mm-thick balsa sheet.
Then began the tricky part. I soaked the two balsa sheets prepared for the hull planking (pre-scribed to represent individual planks) for some 6 hours, to make them pliable. Then, using my new glue (much better than standard white glue) I pinned them in place, one by one. While the first side was drying, I pinned the second side onto the scrap left from preparing the foam core, just to give it about the right shape.
And here is the second side, glued in place. You can see my glue in the background.
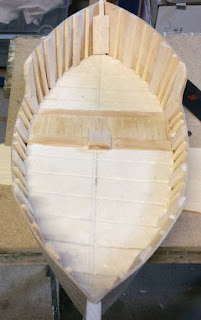
Next, I prepared the fore and aft keel pieces, and put in the exposed parts of the ship's ribs, alternating between extra thick ribs and thinned ones, since that seemed to be the method used in the pics I consulted on the net.
Then it was time to get started on the deck planking. I considered using a single sheet of 1mm-thick balsa, but getting the pieces to fit between all those ribs gave me the willies, so I decided to do individual planks, with thicked transverse pieces corresponding to the thicker ribs, and thinner longitudinal planks in between, the idea being that those planks would be partially removed to load the ship's hold. Of course, since there's just foam beneath the deck, all those planks will be firmly glued in place.
The little square in the middle was intended to receive the single mast which must cogs seemed to use. More on that later.
Since the next step would involve putting in walls (bulkheads?) for the fore- and aft-castles, I decided it was time to slap some paint on those planks. I used a very dilute mixture of brown and black craft paint, with a little black ink thrown in, counting on the balsa to soak up the liquid, which it did quite nicely. This time I included a figure for scale.
I then proceeded to make the walls closing off the fore and aft-castles, as well as the decking for both, which would have to be removable, so as to give some interior space for gaming needs. That's why I chose to use balsa sheets, scribed to represent planking, rather than individual planks, since these pieces would have to be sturdy and durable enough to remove.
One design decision, which I now regret, was in making the forecastle rectilinear rather than curved in shape. Many of the cog images I consulted had rectilinear breastworks to protect the crew and archers, and many even had castle-like crenelations. I decided against the crenelations because I thought they looked silly, and I wish I had also decided to use a curved bow rather than straight pieces. But what's done is done, and I'm sticking with it. I also toyed with the idea of adding another deck to the aft castle, but eventually decided that would look too muck like a caravel or even a galleon. So this is the basic shape of my half-finished cog. A few hours of work, a lot of breaks for soaking wood and waiting for glue to dry, but I got this far in four days of off-and-on building.
It's a work in progress, and I'll post more when I get there. I'm a bit leery about the next steps: railings around the gunwhales, a bit more bracing for the forecastle, stairs and doors. Not too bad so far, though, eh?


