Translate

Saturday, June 29, 2024

How to make a map for tabletop sessions


Whether you often play via VTT and suddenly have the opportunity to run a tabletop game, or simply have a colorful and interesting map that you want to bring to your tabletop game, here are a few tips for making it work, with very little time and almost no cost.

All you need is a color inkjet printer, some paper, scissors and scotch tape.

Last spring, I needed a cool warehouse map for my players to invade to stop some nasty slavers and free their victims. I made this map on Dungeondraft (with Forgotten Adventures assets), including the ground floor, and upper-level catwalk around the edges, and a below-ground water-filled area for smugglers' boats to make deliveries and pickups. Here are the maps.

I wanted to print out this map using 1" squares for 28mm figures. I did it using Word, and this simple procedure:

1) Paste the whole image onto a blank work document, with narrow margins.


2) Using the crop tool, cut down the image to the upper left corner, remembering that a standard sheet of paper can display roughly 8 x 11 1-inch squares.

3) After cropping the image, increase the size to fill the page.

4) Now the cool part: copy & paste the image (Ctrl+C, Ctrl+V) into a new line following the original image, then without changing the size at all re-crop the image so that it shows the next section. As long as you only use the crop tool and don't re-size the image, you'll be able to line up the sections perfectly.

5) Repeat this procedure until you have the entire image reproduced in 1-inch squares. I needed 12 pages for the ground floor of this warehouse.

6) Print it all, then cut off the right and bottom white margins from each page except for the right-most page where you only cut the bottom, and the bottom-most row where you only cut one side. That way, you will have some overlap, allowing you to more easily tape the pieces together. Tape the pieces carefully so they line up exactly and lie flat.


7) I wanted to be able to display the upper-level catwalks and office next to the map, so those pieces needed to be more mobile and more sturdy. So I glued sections onto semi-rigid foamcore, cut to the right dimensions. This turned out to be an even better plan, since the game story (Past Present Future Comics in West Palm Beach) had piles of Warhammer ruins that I was able to borrow to represent the corners of the warehouse and prop up my sections of catwalk. If I'd had more time, I would have made my own walls and corners out of foamcore, but this turned out to be a lot quicker and easier.


This method works with maps you make yourself or that you can find on the Internet. Quick tip: do a Google image search for "battle map keyword" where the keyword is "warehouse", "castle", "ruins" or whatever. Alternatively, if you have the pdf of an adventure from Paizo or some other publisher, you can probably select a map, Ctrl+C and Ctrl+V into any image processing software (even MS Paint) to grab the base image for use at your table. This is what I did for a ruined castle I needed for a different sequence of the campaign. Here, you can see parts of the map are covered over, to keep the interiors secret from the players. A better effect would have been to prepare sections of cardboard sized for each building or group of rooms. But hey, each time you do something like this, you learn what works and can do better the next time.

Total cost: some ink and paper for the printer (hard to quantify), perhaps a sheet of foamcore or simply cast-off cardboard.

Last tip: storing the maps works best when they are rolled (image side out!) rather than folded, as the taped joints can fold badly.

Wednesday, June 19, 2024

How to create 3d terrain for almost nothing

How to create 3d terrain for almost nothing:

  • Every time you install IKEA kitchen furniture, you have polystyrene blocks that you carefully store away, for a rainy day (or you buy an XPS polystyrene insulation block from any hardware store).
  • With a "hot wire cutter" (between €15 and €40 on Amazon) you cut out the reliefs, thinking of cliffs, ravines and waterways (in a very well ventilated place, or even outside).
  • Assemble the pieces with white glue and toothpicks.

  • Cover the Styrofoam with a neutral acrylic paint, as most spray paints have products that dig into the Styrofoam.
  • Roughly paint the hollows with black from a spray can, and then gray or brown on the reliefs (again with plenty of ventilation).
  • Refine the painting with brushes to the desired extent.
  • Apply white glue with a brush on the parts intended to represent the grass, and then sprinkle with model grass (from model railroading) in several different shades.
  • Most of my trees are made with branches collected from behind the house and model railroad lichen. I also ordered miniature palm trees from Amazon, and plastic aquarium plants, but usually they have to be repainted with darker colors.


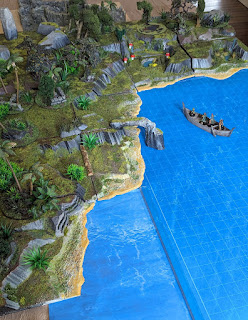
That's what I did. Here are the steps and the result. I started with a Dungeondraft map that I had used on Foundry. I printed it and made squares which I reproduced in 23 x 23cm (the basic size of the IKEA polystyrene squares for my kitchen projects).


This project required a total of 6-8 hours of work over 4 days (to allow for drying).


Saturday, June 15, 2024

Comment créer des décors 3d pour presque rien


Comment créer des décors 3d pour presque rien:

  • Chaque fois que vous installez des meubles de cuisine IKEA, vous avez des blocs de polystyrène que vous gardez précieusement (ou alors vous achetez un bloc d'isolation en polystyrène extrudé à Leroy Merdique).
  • Avec un "hot wire cutter" (entre 15 et 40€ sur Amazon) vous découpez les reliefs, en pensant aux falaises, aux ravines et aux cours d'eau (dans un endroit très bien ventilé, ou carrément à l'extérieur).
  • Assemblez les morceaux avec de la colle blanche et des cure-dents.
  • Recouvrir la polystyrène avec une peinture acrylique neutre, car la plupart des bombes de peinture ont des produits qui creusent dans la polystyrène.
  • Peindre grossièrement les creux avec du noir en bombe aérosol, et puis du gris ou du marron sur les reliefs (encore avec beaucoup de ventilation).
  • Peaufiner la peinture au pinceaux dans la mesure désirée.
  • Mettre de la colle blanche au pinceau sur les parties destinées à représenter l'herbe, et puis saupoudrer avec de l'herbe de modélisme en plusieurs teints différents.
  • La plupart de mes arbres sont fait avec des branches ramassées derrière la maison et du lichen de modélisme ferroviaire. J'ai aussi commandé des palmiers miniatures sur Amazon, et des plantes plastiques d'aquarium, mais en général il faut les repeindre avec des couleurs plus foncés.


Voilà, c'est ce que j'ai fait. Voilà les étapes et le résultat. J'ai commencé avec une carte Dungeondraft que j'avais utilisé sur Foundry. Je l'ai imprimé et fait des carrés que j'ai reproduits en 23 x 23cm (la taille de base des carrés de polystyrène IKEA de mes projets de cuisine).


Les éléments de polystyrène, avant peinture

Avec une couche de laque, et puis plusieurs passages d'aérosols

Avec le flocage de "gazon"

Et enfin, sur la table de jeu.


Friday, June 14, 2024

The Tower of the Tyrant


The Tower of the Tyrant has stood on the coast for over a century, a dark reminder of the days of Ragnar Ironhand. His great-grandson Sigmar destroyed the Temple of Dawn before taking refuge in the Tower, and it is up to the adventurers to put an end to his plans of conquest.

This is a Pathfinder 2nd Edition adventure for level 4 characters. Allow three or four four-hour sessions to complete it. Pregen characters accompany the maps necessary to complete this adventure.

I played the first version of this adventure after last Christmas with a group of family, and then it took me a while to make the maps to my liking. I'm quite happy with the result, using Dungeondraft with Forgotten Adventures resources. 

The hills you see on the cover were made with polystyrene squares salvaged from IKEA kitchen cabinet boxes. Most of the trees were made with twigs collected from the woods behind the house, with moss (lichen) sold for model railroading. The palm trees were purchased on Amazon and repainted, as the original colors were too garish.

Creating your own terrain is really easy. If you don't have polystyrene lying around in your cellar, a sheet of polystyrene insulation is even better, and will furnish materials for many projects. Then, a coat of paint (to insulate the polystyrene from the aerosol cans), a few strokes of gray, black and brown spraypaint, white glue and "grass" sold for model railways, and that's it.

Doing the same job with Dungeondraft is tedious. Of course, the resources are all made in advance (thanks to the Forgotten Adventures team whose style I really like) but when placing things you have to be very careful with the levels and the overlap of the elements. I'm starting to master the tools better, but there are a few map creators who make real works of art.

Also, forest maps are quick and easy compared to the interiors of ruined castles. When working on interiors, I keep adding details every time I open it, I can't stop.

I owe a big thank you to those who helped me with the proofreading: my wife, Michèle, and friends from the Pathfinder-fr Discord, Dalvyn, Alias, Darrak, Bouclier de Kraggodan and Toonsa. As well as to the original playtesters, Maëlia, Nathalaël, JT and Nicolas.


English version: https://www.drivethrurpg.com/fr/product/484670/the-tower-of-the-tyrant-pf2
French version: https://www.drivethrurpg.com/en/product/483679/La-Tour-du-Tyran


For those wondering where this tower came from, it's a battle map pack from Fat Zebra Designs. I bought it on Amazon.fr, but it seems to no longer be available, unfortunately.

Well, if you have taken “The Tyrant’s Tower (PF2)” on DrivethruRPG, don’t hesitate to give me some feedback. I'll take it all.

Friday, June 7, 2024

La Tour du Tyran (PF2)

 La Tour du Tyran se dresse sur la côte depuis plus d'un siècle, un sombre rappel de l'époque de Ragnar Main de Fer. Son arrière petit-fils Sigmar a détruit le Temple de l'Aube avant de se réfugier dans la Tour, et c'est aux aventuriers de mettre fin à ses plans de conquête.
C'est une aventure Pathfinder 2e édition pour des personnages de niveau 4. comptez trois ou quatre séances de quatre heures pour envenir à bout. Des personnages pré-tirés accompagnent les cartes nécessaires pour mener à bien cette aventure.

J'ai joué la première version de cette aventure après Noël dernier avec un groupe de famille, et ensuite cela m'a pris du temps pour faire les cartes à ma convenance. Je suis assez content du résultat, en utilisant Dungeondraft avec les ressources Forgotten Adventures.

Les collines que vous voyez sur la couverture ont été faites avec des carrés de polystyrène récupérés dans des boîtes d'éléments de cuisine IKEA. La plupart des arbres ont été fabriqués avec des brindilles ramassées dans le bois derrière la maison, avec de la mousse (lichen) vendu pour le modélisme ferroviaire. Les palmiers ont été achetés sur Amazon et repeintes, car les couleurs d'origine étaient trop criardes.

Créer vos propres décors est vraiment simple. Si vous n'avez pas de polystyrène qui traine dans votre cave, une plaque de polystyrène d'isolation est encore mieux, et fournira bien des projets. Ensuite, un coup de peinture (pour isoler la polystyrène des bombes d'aérosol), quelques coup de bombe gris, noir et marron, de la colle blanche et du "gazon" vendu pour modélisme ferroviaire, et le tour est joué.
 

 Faire le même travail avec Dungeondraft est fastidieux. Certes, les ressources sont toutes faites à l'avance (grâce à l'équipe Forgotten Adventures dont j'aime beaucoup de style) mais en plaçant les choses il faut faire super gaffe aux niveaux et au chevauchement des éléments. Je commence à mieux maîtriser les outils, mais il y a quelques créateurs de cartes qui font de véritables oeuvres d'art.

 Et encore, les cartes de forêt, ce n'est rien à côté des intérieurs de châteaux en ruines. Je continue à ajouter des détails chaque fois que je l'ouvre, je ne sais pas m'arrêter.

Je dois un grand merci à ceux qui m'ont aidé avec la relecture: ma femme, Michèle, et des amis du Discord Pathfinder-fr, Dalvyn, Alias, Darrak, Bouclier de Kraggodan et Toonsa.

Prochain étape: mettre toute l'aventure et les fiches des PJs prétirés en anglais.

Pour ceux qui se demandent d'où vient cette tour, c'est un pack de battle maps de Fat Zebra Designs. Je l'avais acheté sur Amazon.fr, mais il semblerait ne plus être disponible, hélas.

Bon, si vous avez pris "La Tour du Tyran (PF2)" sur DrivethruRPG, n'hésitez pas à me faire un retour d'expérience. Je suis preneur.