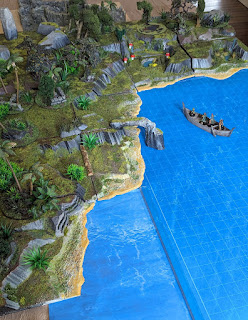
How to create 3d terrain for almost nothing:
- Every time you install IKEA kitchen furniture, you have polystyrene blocks that you carefully store away, for a rainy day (or you buy an XPS polystyrene insulation block from any hardware store).
- With a "hot wire cutter" (between €15 and €40 on Amazon) you cut out the reliefs, thinking of cliffs, ravines and waterways (in a very well ventilated place, or even outside).
- Assemble the pieces with white glue and toothpicks.
- Cover the Styrofoam with a neutral acrylic paint, as most spray paints have products that dig into the Styrofoam.
- Roughly paint the hollows with black from a spray can, and then gray or brown on the reliefs (again with plenty of ventilation).
- Refine the painting with brushes to the desired extent.
- Apply white glue with a brush on the parts intended to represent the grass, and then sprinkle with model grass (from model railroading) in several different shades.
- Most of my trees are made with branches collected from behind the house and model railroad lichen. I also ordered miniature palm trees from Amazon, and plastic aquarium plants, but usually they have to be repainted with darker colors.
That's what I did. Here are the steps and the result. I started with a Dungeondraft map that I had used on Foundry. I printed it and made squares which I reproduced in 23 x 23cm (the basic size of the IKEA polystyrene squares for my kitchen projects).
This project required a total of 6-8 hours of work over 4 days (to allow for drying).


No comments:
Post a Comment